If you’ve ever dealt with irritating clutch noise or felt your bike’s pickup drop off, you know how much it can affect your ride. Whether you own a Yamaha FZS, R15 V3, Honda, TVS Raider, HF Deluxe, Glamour, Platina, or even a scooter, these symptoms are something many riders face. Tell how I fixed heavy clutch noise and low pickup in my bike, what caused the trouble, and how you can keep your ride smooth and strong.
Let’s get into the actual steps, with clear explanations and tips so you can fix low pickup in a motorcycle engine, get rid of annoying clutch sound, and understand what really matters under the clutch cover.
What Is Clutch Noise and Low Pickup? Understanding the Problem
When you let go of the clutch lever and hear a heavy rattling or a sharp ticking, it’s not just annoying. It’s a sign that something’s off inside your engine’s heart. A noisy clutch can mess with how your bike accelerates (pickup), can make gear shifts jerky, and may even hide bigger future repairs if you leave it unattended.
Here’s what I noticed on my Yamaha FZS:
- Loud, heavy noise every time I released the clutch lever
- Pickup felt sluggish, especially when riding with a pillion or on slopes
- The noise didn’t go away even after replacing the clutch basket once
Common clutch noise symptoms:
- Rattling from the clutch area
- Squeaking or clicking on clutch lever movement
- Delayed acceleration or “lazy” engine pickup
If you’ve heard tik-tik, tak-tak, or grinding sounds from your bike’s left side, don’t brush them off. They can wear down crucial engine parts and leave you with expensive repairs down the line. Early fixes go a long way.
Getting Ready: Initial Inspection and Safe Preparation
The first thing you need is a safe, clean work area. Always let your bike cool down. I started by draining the old engine oil since any clutch work needs the engine to be oil-free to prevent messy spills and keep things clean.
Here’s the prep process I used:
- Drain the engine oil
- Remove the oil drain bolt and let the oil collect in a clean pan.
- Wipe down the engine area.
- Safety rule: Never run your engine without oil except for very quick sound tests like I did for the demo. Running your engine dry can do serious damage.
- Remove the clutch cover
- Unscrew the clutch cover bolts one by one.
- I kept the bolts in the order they came out so I wouldn’t mix them up.
- Gently pry the cover off. Don’t force it—if it sticks, use a soft mallet or tap gently around the edges.
- Inspect for play in the clutch basket
- Wiggle the clutch basket by hand. There shouldn’t be any wobble or sideways movement.
- A little movement is normal, but heavy play means something’s worn out.
Pro tip: If you plan to refill your engine, use a high-quality oil. You’ll find good options like SEA 90 Gear Oil that work well for gear-driven clutches, which helps finish the job right.
Checking Clutch Components: Finding the Real Trouble
Once the cover was off, I moved on to exploring each clutch part:
Clutch Basket Inspection
- Look at the clutch basket carefully. If you see grooves, scratches, or worn-out teeth, you’ve found one big cause of noise.
- Even after I replaced my clutch basket, the noise didn’t go away, so I needed to look deeper.
Clutch Plate and Pressure Plate
Taking out the clutch plate and pressure plate is simple with the right tools. Here’s what to check:
- Warped, bent, or broken clutch plates. Even a small bend can create ticking or chattering.
- Friction material should be evenly worn—not glazed, burnt, or cracked.
- The pressure plate must sit flat, not wobble or look curved from heat.
Clutch inspection checklist:
- Check every plate for cracks or bends
- Inspect the pressure plate for smooth, flat contact
- Ensure no metal pieces are lodged or loose
Handling Small Parts
Inside the clutch assembly, there’s usually a small ball bearing. Handle it with care—losing or misplacing it will mess up your reassembly and can even cause more noise later.
For loosening the clutch nut, I used a specific holding tool. This stops the clutch center from turning, making nut removal much safer.
Comparing Clutch Baskets: Yamaha vs R15 V3
I tried using an R15 V3 clutch basket in my Yamaha FZS, thinking it would solve my problem. It worked for a while (about 4,000-5,000 km), but then the noise came back. This told me the clutch basket wasn’t the whole story.
Main point: A basket swap isn’t always enough. Sometimes the interacting gear is the root problem. Don’t stop your inspection too early.
The Role of the Primary Gear Drive: Diagnosing and Fixing Main Problems
What does the primary gear drive do? It connects the clutch basket to your crankshaft, transferring power through interlocking teeth. If those teeth wear out or get damaged, every clutch movement produces noise that feels and sounds wrong.
Removing and Inspecting the Primary Gear Drive
I removed the primary gear with care:
- Place a screwdriver between both gears so that when you turn the nut, the gears can’t spin.
- This is a two-person job if you want to avoid accidental slips and stripped threads.
- Once the nut was out, the gear slid off easily.
Looking at the gear, I saw sharp grooves and worn-out teeth. These marks were clear signs that my gear was worn out and ready for replacement.
Signs of a faulty primary gear:
- Visible grooves or notches on gear teeth
- Shiny, uneven, or chipped metal surfaces
- Gear feels “loose” or wobbly on the shaft
Old vs New Primary Gear Drive Comparison
Buying a new primary gear drive cost me about ₹583, which is cheap compared to the damage bad gears can cause.
Side by side, the new and old gears looked dramatically different:
- The old gear’s teeth were dull and chewed up
- The new gear was clean and sharp, promising a smooth connection with the clutch basket
Why mismatching clutch basket and primary gear is risky: When you install a brand new clutch basket (with sharp, unworn teeth) onto an old primary gear (with worn teeth), the sharper basket teeth can “shave” off the already worn gear teeth, making noise and leading to failure. That’s what happened to me.
Lesson learned: Every time you replace a clutch basket, check and replace the primary gear drive if needed. It’s much cheaper to fix early than to risk a breakdown later.
Step-by-Step Clutch Assembly: Getting It Done Right
Once I had the new gear and all other parts checked, it was time to put things back together.
- Place the clutch basket into the housing
- Align it carefully with the primary gear drive so teeth mesh smoothly.
- Install washers and key components
- Add washers, ball bearings, and any other spacers in the same order they came out.
- Refit clutch plates and pressure plate
- Check orientation: the flat side of the pressure plate faces you, and the curved side faces the engine.
- If you reverse this, your clutch will not work right.
- Screw in springs and bolts
- Hand-tighten each bolt to get started, then tighten them down in a criss-cross pattern to keep pressure even.
- Don’t overtighten, or you can snap bolts or warp plates.
- Fit the clutch hub nut and lock washer
- Make sure all parts are tight and there’s no leftover play in the assembly.
- Clean all surfaces before final assembly
- Dirt or old oil left inside will make noise or reduce clutch life.
Important assembly tips:
- Never leave any part loose. Even a single unfastened bolt can undo your hard work.
- Always double-check the orientation and fit of every plate and gear.
- If you suspend the ball bearing or any small part, make sure to keep it safe until the very end.
Testing Your Fix: Final Checks and Road Testing
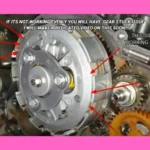
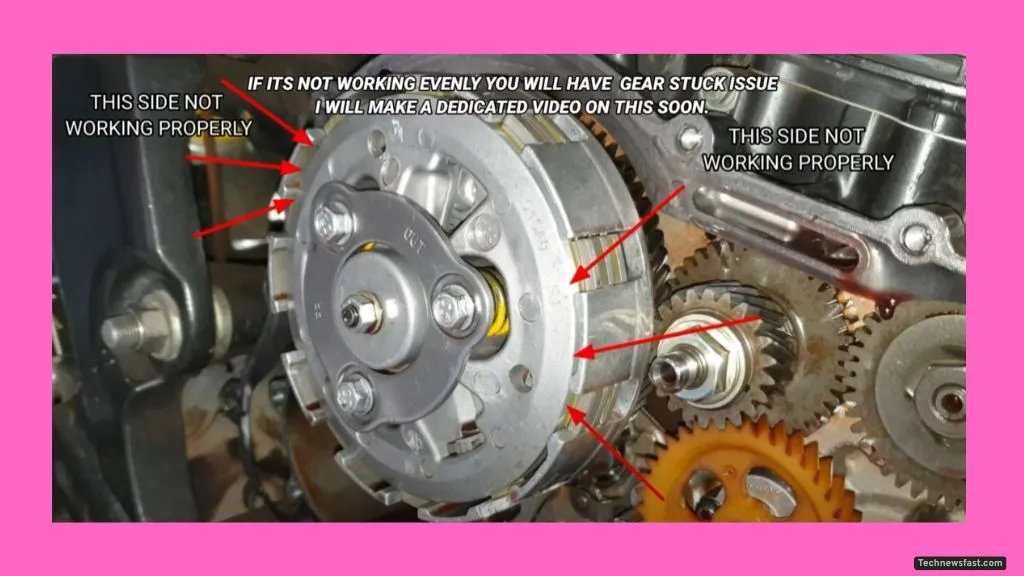
Before closing up everything, I pressed the clutch lever by hand and watched the clutch assembly. It moved out evenly, without any sideways tilting or odd movement. This smooth, even motion means every clutch plate is seated perfectly.
Post-assembly checklist:
- Press clutch lever and confirm even plate movement
- No parts should rub or drag unevenly
- The clutch should move in and out smoothly
For the final check, I started the engine quickly without oil just to demonstrate the sound (please, don’t do this at home; fill with oil first). The difference was immediate—the heavy noise was gone, and the engine pickup felt crisp and responsive.
Key Takeaways: Fixing Low Pickup and Clutch Noise for Good
After all this, I learned that fixing low pickup in a motorcycle engine is about careful inspection, using the right replacement parts, and assembling everything with care.
Quick recap for all bikes (Yamaha, Honda, TVS Raider, HF Deluxe, Glamour, Platina, scooters):
- Heavy clutch noise often means more than just worn clutch plates—inspect the primary gear drive too.
- Always replace both the clutch basket and primary gear when possible.
- Use good engine oil and change it regularly.
- Handle small parts like ball bearings with care.
- Finish by testing clutch movement and listening for noise before final assembly.
Regular maintenance tips:
- Don’t ignore clutch noises
- Replace clutch and primary gear together if you see heavy wear
- Always use the correct type of oil and keep your engine topped up
By following these steps, you can solve low pickup, rattling sound, and clutch problems in most bikes quickly and keep your ride running strong—without needing a mechanic every time. Whether you ride Yamaha, Honda, Hero, TVS, or Bajaj, good clutch care keeps your road adventures worry-free.
Read also.